Managed Databases
Most self-hosted applications need a database, and PostgreSQL is the most common one. Managed Databases let you create a PostgreSQL server in one click, then hand each application its own database with its own credentials, back everything up on a schedule, and restore a snapshot whenever you need.
The database is only reachable from inside your Constellation network by default, so it is private to your servers and devices without any firewall work.
Where to find it
Go to Constellation > Databases. The page has three tabs: Databases (the list), Monitoring and Events.
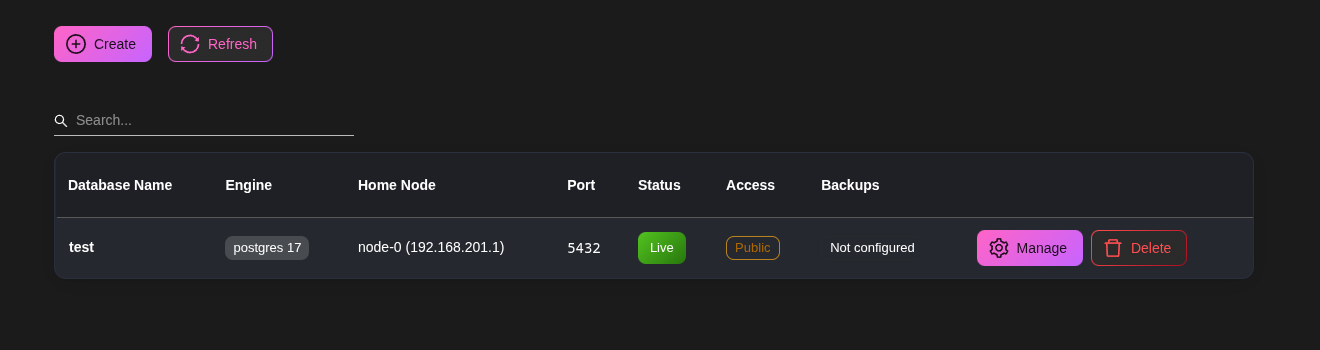
Each row shows the name, engine and version, the Home Node (the server it runs on), its port, its Status (Live or Down), whether it is Constellation only or Public, and whether backups are configured. Click Manage to open a database.
Creating a database
Click Create.
- Database Name: lower-case letters and digits, starting with a letter (for example
maindb,nextcloud). It becomes part of the container name and of the connection URL. - Restrict to Constellation: ticked by default. Untick it only if applications outside your Constellation need to connect, see Public access.
The database is created on the server you are currently using, which becomes its home node. If you want it on a specific server, open Cosmos on that server before clicking Create.
Creation takes a few seconds. The page may refresh once while the server picks up the new route. The database then appears as Live in the list.
Connecting to your database
Open the database and look at the Connection card on the Overview tab. It shows the Host, Port, Superuser and Password, plus a ready-to-use Superuser connection URL. Click the eye icon to reveal a value and the copy icon to copy it. You need your admin privileges enabled to see credentials.
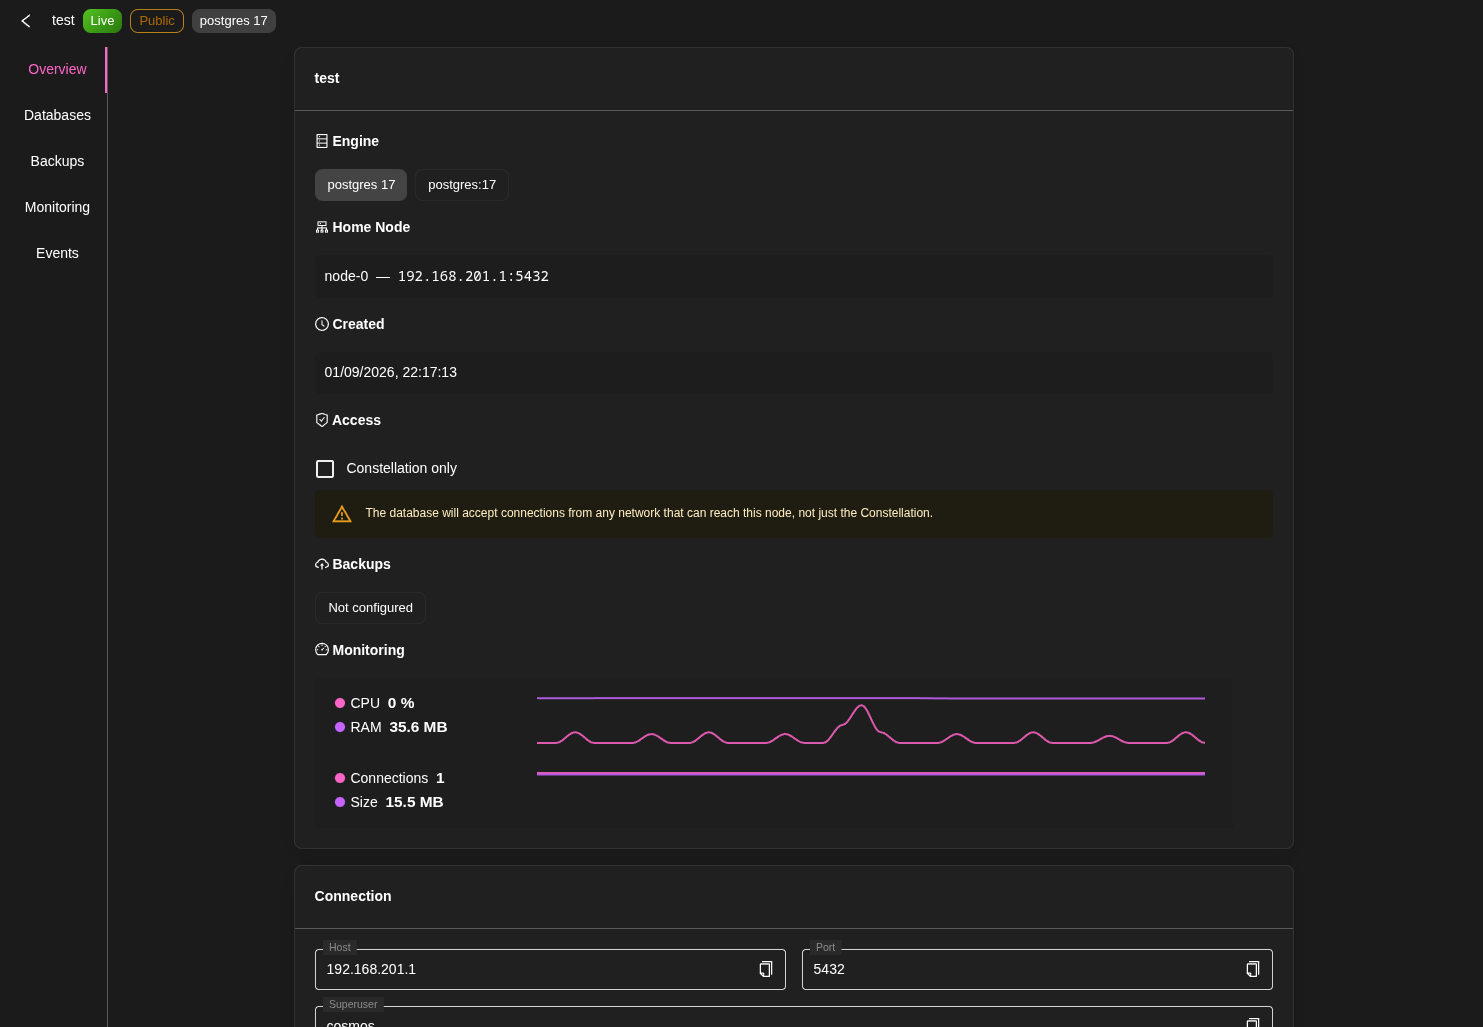
The host is the Constellation IP of the home node, so this URL works from any server or device connected to your Constellation. Connections already travel inside the VPN, which encrypts everything, so the URL uses sslmode=disable; keep it that way in your applications.
The superuser has full access to everything. It is handy for a database tool, but applications should get their own database instead, as described next.
Application databases
The Databases tab of a managed database lists its Application databases. Each one is a separate database with its own user and password, so one application cannot read the data of another.
Type a name in New database name (for example nextcloud) and click Create. A masked connection URL appears, ready to paste into your application.
- Rotate password generates a new password for that database. Connections already open keep working until they reconnect, so update your application and restart it.
- Delete drops the database and its user, along with all its data.
Using it from your applications
When you install an application, paste the connection URL of its application database in its configuration (usually an environment variable such as DATABASE_URL). The host, port, user, password and database name are also available separately for applications that want them split.
Inside a compose file, whether for a ServApp or a deployment, you can reference the values with template variables instead of copying them, which keeps the secret out of the compose:
"environment": [
  "DATABASE_URL=${db.maindb.nextcloud.url}",
  "POSTGRES_HOST=${db.maindb.nextcloud.host}",
  "POSTGRES_DB=${db.maindb.nextcloud.dbname}",
  "POSTGRES_USER=${db.maindb.nextcloud.user}",
  "POSTGRES_PASSWORD=${db.maindb.nextcloud.password}"
]
Here maindb is the managed database and nextcloud the application database. Rotate the password and the next restart of the application picks it up.
Public access
If an application outside your Constellation needs the database (a service hosted elsewhere, a developer's laptop that is not on the VPN), untick Constellation only on the Overview tab. The database then accepts connections from any network that can reach the home node on its port. Tick it again at any time to close it.
Backups
Open the Backups tab and click Configure backups.
- Run backups on schedule: untick it to pause scheduled backups while keeping the repository and the existing snapshots. Backup now still works while paused.
- Repository: where the backups go. This is a restic repository: a folder on disk, or a remote storage such as
rclone:myremote:/backups/maindb. The path is used on the database's home node, so make sure it exists there. - Backup schedule: when to back up. The default is every night at 4am.
- Cleanup schedule and Retention policy: when to prune old snapshots and how many to keep. The default keeps the last 3 backups, 7 daily, 8 weekly and 3 yearly.
Every application database is dumped into the snapshot, so a single backup covers everything on the server. Backups run as jobs on the home node and appear in the Scheduler page like your other backup jobs.
Click Backup now to take a snapshot immediately. Snapshots are listed under the settings with their date, and a Refresh button.
Restoring
Click Restore next to a snapshot. Restoring always creates a new managed database, so the current one is never touched: you can restore yesterday's data next to today's, compare, and point your application to whichever you want.
- New database name: the name of the database to create.
- Restore every database in the snapshot, or pick the application databases you need.
- Host port (optional): leave empty to let Cosmos pick a free port.
The new database is created on the server you are using, so the repository must be reachable from it (a remote storage repository is reachable from anywhere). When the restore completes, the dialog shows the connection URLs of the restored databases with fresh passwords. Copy them right away: they are shown once. You can rotate them later from the Databases tab if you lose them.
Deleting a database
The Danger zone at the bottom of the Overview tab deletes the managed database. By default the data volume is kept on the home node, so creating a database with the same name later brings the data back. Tick Also delete the data volume to remove everything.
Monitoring and events
The Monitoring tab of a database graphs its size, connections and resources. The Events tab lists its history: creation, changes, backups and restores. The page-level tabs show the same for all your databases at once.
Databases named swfs... are created automatically by Object Storage to hold its file index. Leave them alone, they are removed with the object storage.